

How To Add A Wifi Network In Windows 7
Z7_3054ICK0KGTE30AQO5O3KA30N0
hp-concentra-wrapper-portlet
![]() Actions
Actions
HP PCs - Creating a Wireless Domicile Network (Windows 7)
This document pertains to HP and Compaq computers with Windows 7.
Windows 7 supports connection of multiple computers in a dwelling network. Creating a network can be a convenient way to share files and printers in the home. This document provides instructions for setting up a wireless dwelling network and sharing folders and files on the network.
Setting up a local network and file sharing in Windows 7
Creating a network can be a convenient manner to share files and printers between computers at domicile. Use the steps in this section to gear up a home network using wireless hardware.
note:To perform some of the steps in this document you must be logged in to Windows 7 using the main administrative account. Commonly this is the first business relationship that was created when the estimator was first turned on.
Stride 1: Before you brainstorm setting upwardly a wireless home network in Windows vii
Confirm that you lot accept the following hardware. Click the heading or the accompanying plus (+) sign to aggrandize the data.
-
Wireless LAN hardware
Not all computers come up with wireless LAN hardware. If you are unsure if the computer came with wireless LAN hardware, bank check the product specifications. In the Questions or keywords field at the top of this page, enter the product number for your computer and type specifications (for instance: 300-1025 specifications). Click the link for your product specifications from the listing of search results. On the Production Specifications page, check the Networking section for wireless hardware.
If the specifications do not show wireless hardware but yous believe the computer has wireless hardware, check Device Manager by using the following steps:
-
Click Commencement
 , and so type Device Director in the Search box. Click Device Manager from the list of results.
Effigy : Opening Device Manager from the Starting time menu
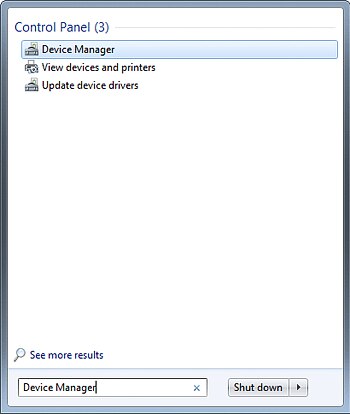
The Device Manager window opens.
-
Double-click Network adapters.
Figure : Network adapters in Device Manager

-
Check for wireless LAN hardware.
notation:
If no wireless LAN hardware is listed in Device Manager, click Activeness, and and so click Scan for hardware changes. If the hardware is nevertheless not listed, restart the computer, and so return to Device Manager. Windows 7 automatically detects hardware and installs drivers upon organisation startup. If no wireless LAN hardware is listed after restarting, no hardware is installed.
If no wireless LAN hardware is installed and yous want to connect to a wireless network, buy and install a PCI (internal) or USB (external) wireless LAN adapter.
-
Follow these steps before continuing with the other steps in this document:
-
Disconnect from the Internet. If y'all have a DSL or cable modem, disconnect it.
-
Disable any firewall software. Firewall software might interfere with network setup and can reenabled afterward network setup is complete.
Step 2: Fix up and connect network hardware for a wireless domicile network
Set up and plough on the ability for the wireless network router or other networking device.
Connect a broadband cable or DSL modem to the router
Follow the instructions provided by the manufacturer to connect a broadband cable or DSL modem to the router (in some cases, the modem and router are combined into one device, and may be referred to as a wireless access bespeak), and to fix security for the wireless network.
Figure : Wireless network instance: wireless router, two wireless notebooks, and a wireless computer with a printer

Pace iii: Running the Windows 7 network setup wizard
Use the Windows 7 network setup sorcerer to assistance add computers and devices to your wireless network.
Using Windows 7 network setup wizard
Add computers and devices to your wireless network using the Windows seven network setup sorcerer. Follow these steps to gear up the network:
-
Click Start
 , and then click Command Panel.
 -
Under Network and Cyberspace, click View network status and tasks.
Effigy : View network status and tasks

The Network and Sharing Centre opens.
Figure : Network and Sharing Eye

-
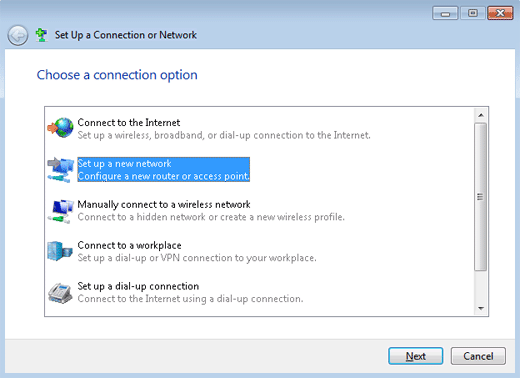
Click Set up a new connectedness or network to set up a router or access point.
-
Select the connection option Set upward a new network, then click Adjacent.
Figure : Cull a connection selection
-
Follow the instructions to prepare a wireless network.
Step 4: Connecting to a wireless home network in Windows 7
Depending on the type of computer you are using, follow these steps to connect each figurer to the wireless network.
Turning on the wireless device and HP Wireless Assistant in Windows 7 (notebook computers only)
Follow these steps to turn on the wireless device and HP Wireless Assistant on a notebook computer:
-
Plow on the wireless device past moving the switch to the On position, by pressing the wireless role key on the keyboard, or by pressing the touch on point on the panel above the keyboard.
On most notebook computers, there is an LED light
 that glows blue when the wireless device is turned on and enabled, and glows orangish when the wireless device is turned off or disabled. Some notebook computer models may use a different colour scheme.
The power switch for the wireless LAN device, and the Bluetooth device (if equipped), is usually located on the side of the case or above the keyboard, depending on the computer model.
-
In the toolbar notification expanse, locate the HP Wireless Banana icon.
-
If information technology is On
 , continue to the side by side section.
 -
If it is Off
 , right-click the icon and select Open Wireless Assistant. Click Plough On to enable the device.
 -
If there is no icon, click Start
, select Control Panel, click Network and Internet, and then click HP Wireless Banana to open the HP Wireless Assistant and Turn On (enable) the wireless device.If HP Wireless Assistant is non listed in the Control Panel, employ another computer to download it from the HP Software & Driver Downloads Web page.
-
Connecting to a network from the Windows 7 Network and Sharing Center window
Use these steps to connect to a network from each computer using the Network and Sharing Center window:
-
Click Kickoff
, and and so click Control Console. -
Under Network and Internet, click View network status and tasks.
Figure : View network condition and tasks
The Network and Sharing Center opens.
Figure : Network and Sharing Center
-
Click Connect to a network.
-
Select your network, and then click Connect.
-
Enter the network laissez passer phrase (or security key) for the selected wireless network.
Figure : Security primal or pass phrase
-
Click OK. The computer connects to the network.
-
Select a location for the network, commonly Habitation network.
Figure : Set Network Location

-
If yous chose Abode network, select what yous want to share with other home computers running Windows 7. So click Adjacent.
Effigy : Select what you lot desire to share

-
View the Network and Sharing Heart window to verify that the new network connexion is at present continued.
Figure : Network and Sharing Center
Stride 5: Turning on network discovery and file and printer sharing for each computer (Windows 7)
Turn on network discovery and file and printer sharing on each reckoner that you want to access on the network.
Setting the Network discovery and Advanced sharing settings in Windows vii
Alter the homegroup and sharing options to cusomize your wireless network sharing. Follow these steps to cull your settings.
-
Click Starting time
, then click Control Panel. -
Under Network and Internet, click Cull homegroup and sharing options.
Figure : Choose homegroup and sharing options

-
In the Homegroup settings window, click Change advanced sharing settings.
Effigy : Homegroup settings

-
Select Plow on network discovery and Turn on file and printer sharing. Review the other settings and turn them on or off.
Effigy : Avant-garde sharing settings

-
Click Save changes.
Step 6: Share drives, folders, and files in a wireless network (Windows seven)
Set sharing options for files and non-public folders on the computer y'all want to share from.
Setting sharing options and permissions in Windows 7
To share non-public folders between computers on your network, do the following:
-
Click Start
, and then click Calculator. -
Scan to the binder you desire to share.
-
Right-click the folder, select Share with, and and then click Homegroup (Read), Homegroup (Read/Write), or Specific people.
Figure : Share with menu options

-
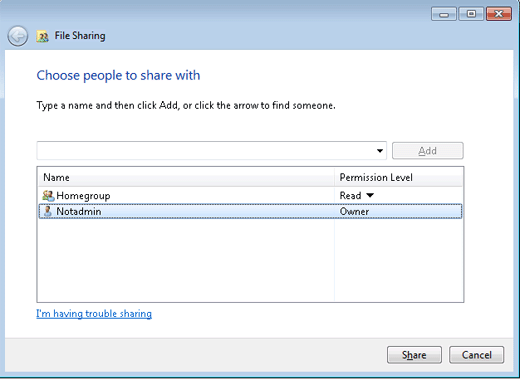
If you cull Specific people, the File Sharing window is displayed.
-
Click the down arrow, select the user or users you desire to share with, and and then click Add.
notation:
You might be prompted several times by User Account Control for permission to go along. You must have these windows to make the necessary changes.
Figure : Cull people to share with
-
Click an arrow under Permission Level to set the permission level for each user or grouping.
-
Click Share.
Pace 7: Testing a wireless network in Windows 7
Check your network by browsing through the shared folders on each computer on the network from the Windows seven Network window.
Verifying the setup by browsing through all shared folders and accessing files from each computer on the network (Windows 7)
Open the Network window and browse through the shared folders on each computer on the network.
Figure : Network window
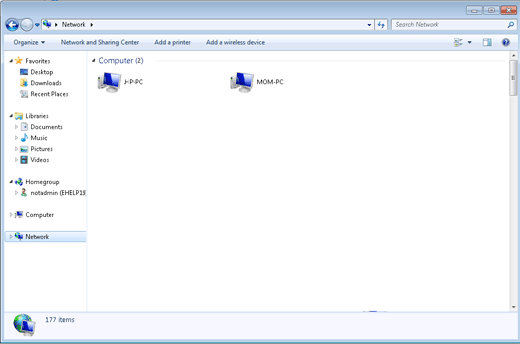
If the figurer is able to read and access files from a remote computer, the remote computer is fix correctly. Browse to every available computer from each estimator on the network. If there are any issues, go back through these steps and verify that the settings are right.
When all computers are able to network to every other reckoner on the network, continue to the next step.
Footstep viii: Enabling Internet admission and firewall for a wireless network
Once you have verified that your dwelling house network is capable of transferring files, connect and enable Net connections for computers with Internet admission.
caution:Make certain that each figurer with Internet admission is well protected from security threats. At the minimum, each computer should have its Internet connectedness protected with a firewall and Windows should be updated with the latest critical updates from Microsoft Windows Update. If malicious activity comes though one calculator, the activeness tin can speedily spread through the entire network.
Source: https://support.hp.com/id-en/document/c01894383
Posted by: massingillglelavold.blogspot.com
0 Response to "How To Add A Wifi Network In Windows 7"
Post a Comment